

Light changes everything in photography. You can stand in the exact same spot, use the same camera, and end up with two wildly different images—just because the light shifted a little. That’s why timing matters so much more than most people expect, especially if you’re just starting out.
Ever wonder why some photos feel soft, warm, even a little cinematic—while others look flat or harsh? Nine times out of ten, it comes down to the quality of the light. And while we’re at it, we’ll cover a few blue hour ideas, tricks for using natural light to your advantage, and some ways to handle outdoor shooting when the light’s not doing you any favors.
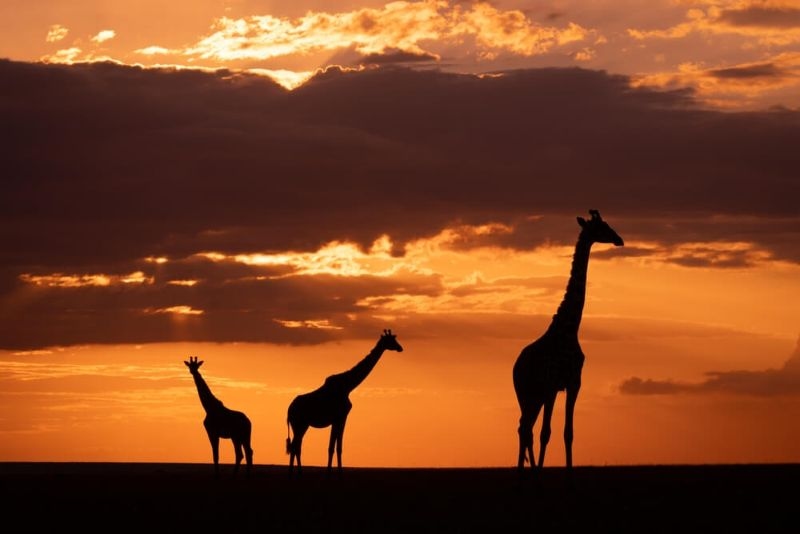
Here’s what people say: Golden hour is the best time to shoot. But what does that actually mean? It’s not just about a nice glow. It’s about how the light falls—direction, softness, and a real sense of depth.
Golden hour happens right after sunrise and just before sunset. It’s when the sun sits low on the horizon, and everything feels different. The light? Softer, warmer. Shadows get long. Colors just pop.
This part’s kind of wild. When the sun’s low, its rays travel through more atmosphere. Blue tones filter out a bit. What’s left? All those golds, reds, and softer hues.
So what does that do for your photos?
It’s the kind of light photographers chase all year.
You can’t just show up and hope. Timing’s everything. Use tools like PhotoPills or The Photographer’s Ephemeris to find out exactly when golden hour happens in your area.
Here’s what actually helps:
Surprisingly, sometimes the best shots happen right after the sun slips out of sight.
Timing isn’t just about golden hour. It’s about how light shifts during the whole day and how you use that on purpose.
Morning light feels fresh, almost clean. The air’s clearer, especially out in the countryside or in national parks. Evening light, though, is warmer and a little more dramatic.
Honestly, shooting at noon can be tough.
The sun’s overhead, and you get:
But that doesn’t mean you have to pack up your camera. Just work with what you’ve got—look for shade, use a reflector, or focus on details instead of wide shots.
You don’t need a bunch of fancy gear to get better photos. Sometimes, being smart with the natural light is what really matters.
The way light hits your subject changes the whole look. Front lighting is even and safe, but kind of flat. Side lighting brings out texture and depth—perfect for landscapes or buildings.
Shadows aren’t the enemy. They’re actually part of the composition. Long shadows during golden hour add mood and dimension. Don’t run from them—work them in.
For example:
Once you start seeing shadows as tools, your photos just feel more intentional.
Settings matter—even the best light can’t save a bad exposure.
Golden hour light is soft, but it changes pretty quickly, so you need to be flexible.
A good starting point:
Keep an eye on your exposure. The light can fade as fast as the sun sets, so don’t be afraid to tweak things.
As it gets darker, you’ll need slower shutter speeds. That’s when a tripod becomes super helpful.
Here’s why:
And honestly? Once you get used to a tripod, it’s hard to stop using one.
Golden hour gets most of the attention, but blue hour is hiding in plain sight right before sunrise or just after sunset. Feels totally different.
During blue hour, the sun has just dipped below the horizon, but there’s still some light left.
So, you get rich, deep blues. This works great for:
The world just feels quieter and more subtle.
You’ve only got 20–40 minutes, so work fast.
Simple plan:
That contrast—warm lights against cool sky—looks incredible.
Low light can feel tricky, but there are ways to get it right.
Raise ISO if you need to, but don’t go overboard. The higher you go, the more noise you’ll see. A tripod comes in handy here, too—you can use slower shutter speeds instead of cranking up ISO.
Autofocus isn’t perfect when it’s dark. If your camera’s hunting for focus, try switching to manual. Aim at something bright to focus, then tweak if needed. Sometimes, patience is all it takes.
Timing isn’t just a technical thing in photography. It’s the base for everything you create. Golden hour tips help you get soft, amazing light that can make almost any photo better. But it doesn’t stop there. Knowing how to spot good light, understanding how time of day changes your photo, using natural light tricks, and paying attention to your camera settings—all that makes a big difference.
Arriving 30 to 45 minutes early gives you time to set up, test compositions, and adjust settings. Light changes quickly, so being prepared helps you capture the best moments without rushing.
Yes, and it can look beautiful. Position your subject near a window where soft sunlight enters. Use curtains or blinds to diffuse the light for a softer, more natural effect.
Wide-angle lenses are great for landscapes, while prime lenses like 50mm or 85mm work well for portraits. The choice depends on your subject and composition style.
Not always. Golden hour light already enhances colors and tones naturally. Light adjustments like contrast or exposure can help, but heavy editing is usually not needed.
This content was created by AI